That doesn't mean the EOS R doesn't have its issues: there's of course the 1.7x crop in 4K, the lack of dual card slots or a joystick, and then there's that 'experimental' touch bar. Below are 10 tips and lesser known features to improve your filmmaking experience on the EOS R. Well, 12 actually, but that doesn't have the same ring to it...
Single-handed operation
First, let's get a few basics out of the way: although the EOS R features a great touch-screen, when filming it's often much easier and faster to change settings single-handedly, using the buttons and dials on the body. In video mode, you can change the shutter-speed using the front-dial, the aperture using the back-dial and the ISO by pressing the M-fn button and then using the front dial. Since the shutter-speed isn't something you need to change often in video mode, you could also set the front-dial to be the aperture dial, and the back dial to change the ISO. To do so, go to:
Menu > Custom Functions > 4 > Customize dials
The nice thing is that these settings only affect the manual video- and photo-modes, so you can keep using Aperture Priority (Av) or Shutter Priority like you normally would. Configuring your EOS R this way also eliminates the extra button press for changing the ISO: the back dial now adjusts the ISO directly.
No Joystick
Missing the joystick to set your focus point? You can either use the touchscreen (even when using the EVF if you enable 'Touch and drag' in the AF menu), or press the focus selection button on the back and then use the D-pad like a joystick. For even faster AF-point selection, go to
Menu > Custom Functions > 4 > Customize buttons
and assign the arrow keys to "Direct AF point selection". To quickly recenter the AF point, press the trash-button.
I also configured the Q-button to pause/resume servo AF. This way I can quickly pause servo AF, move the focus point and then resume AF, all using the arrows keys and the Q-button.
No dual cards slots
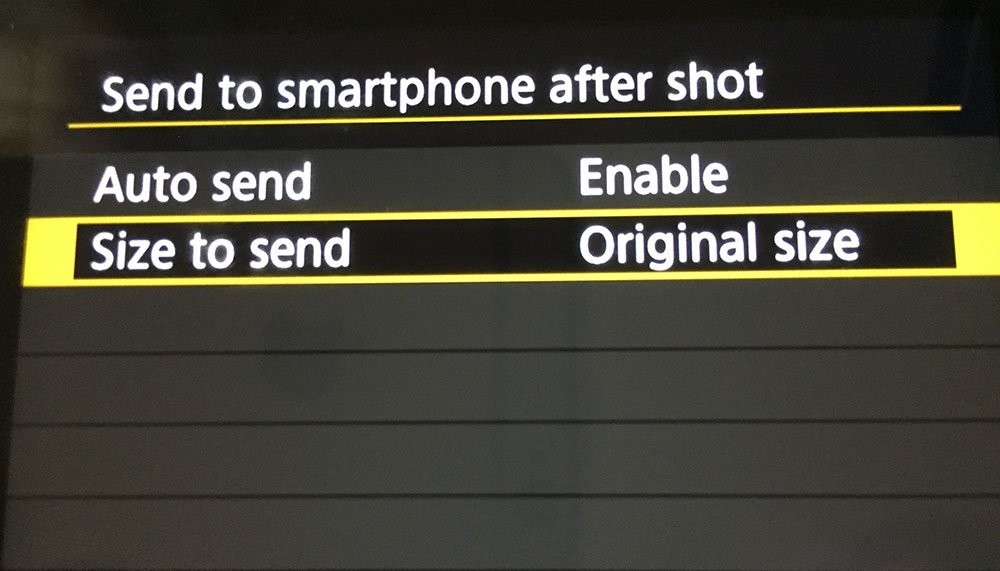
Bummed that the EOS R does not have dual card slots? Well there is a solution for this issue too, just go to:
Menu > Settings > Wrench > 5 > Wireless communication settings > Wi-Fi settings
And enable "Send to smartphone after shot". Now every photo you take will be automatically be backed up to your smartphone! This feature great for instant sharing on social media and reviewing or editing your footage on a bigger screen. The downside is that this only works for images, not for video.
Work around the crop in 4K
Of course, one of the biggest downsides of the EOS R is the 1.7x crop in 4K. However, unlike the 5D Mark IV, the EOS R accepts APS-C lenses that were made for cropped-sensor cameras. With excellent APS-C lenses like the Sigma 18-35, Canon 17-55 or 10-18 the crop becomes a fairly manageable 1.1x crop compared to APS-C. This makes the EOS R a great B-cam to cameras like the C200 and C300, which come with a 1.6x 'crop' by default.
Another option is to get the Metabones Speedbooster EF-RF, which has been specifically designed to mitigate the 1.7x crop on the EOS R and EOS RP. Apart from the wider field-of-view, you also gain an extra stop of light.
Review of the Metabones Speedbooster EF-RF by Potatojet
Get more reach out of your lenses in photo mode
The fact that the EOS R is the first Canon full frame that also accepts APS-C lenses (the camera crops automatically when you attach an APS-C lens), can also be used creatively. When you attach a full-frame lens, you still get the option to crop in on the sensor. This allows you to turn your 35mm prime into a 35mm and 56mm prime, or your 24-105 to a 24-105 and 38-168mm lens! To enable the 1.6x crop in photo-mode:
Press Q > Cropping/Aspect ratio > 1.6x (crop)
In that same menu you can also change the aspect ratio to 1:1 (Instagram), 4:3 or 16:9
Disable focus-by-wire on RF lenses
The release of the EOS R also marked the introduction of Canons new RF lens mount, along with a whole new line-up of lenses. A downside of Canons RF-mount lenses is that they are focus-by-wire (meaning the focus depends on the speed at which you turn the focus-ring, not the angle). This makes them hard to use for repeatable manual focus, and outright unusable if you use any kind of follow-focus. Luckily Canon included the option to make the behavior of the focus ring linear and repeatable.
Variable ND Adapter
Although the new lens mount also means you have to use an adapter to use your older EF lenses, Canon actually turned this potential drawback into a huge advantage for filmmakers. Alongside the standard EF to RF adapter, they also released an adapter with a built-in variable ND filter slot. This means that you no longer need screw-on variable ND in various different sizes (and all the hassle of step-down rings or repeatedly screwing on and off filters). Furthermore: you can use the adapter with any (future) RF-mount camera, like the upcoming RED Komodo.
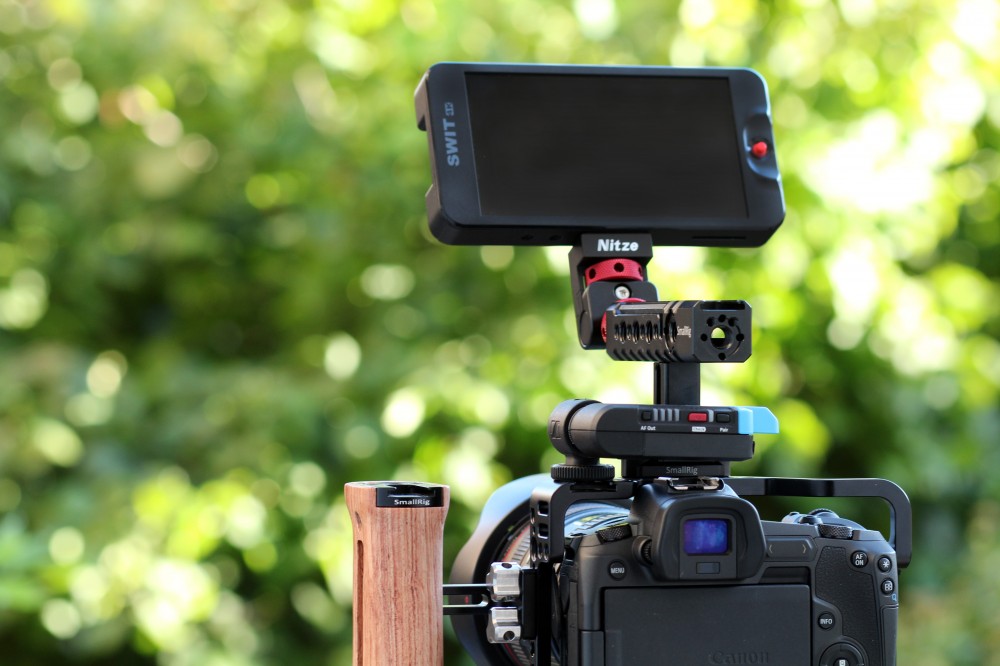
The Canon EOS R with Smallrig cage/handle and Nitze monitor mount
Enabling timecode on the EOS R
If you do studio shoots or concert registrations with multiple cameras, you're going to love the EOS R's ability to use timecode. You can sync multiple cameras to a master clock, or manually start the timecode on multiple cameras. A great starting point for using timecode on the EOS R is Kusharga's video on timecode on the EOS R.
Manual Focus Aids
If you prefer to focus manually, the EOS R has a very useful (almost game-like) manual focus assist feature called "Focus Guide". Line up the two triangles to make sure you're in focus. If the triangles are displayed on top, your need to focus closer (turn clock-wise), and vice-versa. To activate it, go to:
Menu > AF > 2 > Focus Guide
If you prefer focus peaking, you can enable it through:
Menu > AF > 2 > MF Peaking Settings > Peaking > on
No suitable C-log LUTs available
Anyone who's tried the Canon-provided C-log LUTs on footage shot with the EOS R will notice that the results are far from satisfying: colors look weird, skin tones are off, and the LUTs are generally too punchy. That's why I've created a set of LUTs specifically designed for C-log on the EOS R and 5D Mark IV. The LUTs convert Canon log to rec709 and can be used for quick turnaround or as a starting point for further grading.
Bonus tip: 4K timelapse
I saved one of the nicest features in the EOS R for last: 4K timelapse. This feature silently takes 4K stills at the chosen interval, and automatically stitches them together into a higly detailed 4K video file. To activate 4K timelapse, go to
Menu > Camera > 2 > Timelapse movie
and then choose the interval and number of shots. You'll see how long it takes to make the timelapse and how long the final movie lasts.
Compilation of timelapses I made on the EOS R
Do note that you need to disable Canon Log in order to use the 4K timelapse mode. Fun fact: the 4K timelapse function actually uses the 1.6x APS-C crop instead of the 1.7x crop it uses in 4K video, so it's slightly wider than the 4K video mode.